Introduction to Star Trackers
Unlocking the Potential of Astrophotography
 Alfredo J. | May 28, 2023 | Categories: astrophotography, star trackers, techniques, tips & tricks | Tags: astrophotography, milkyway, vialactea, astrofotografía, ioptron, skywatcher, star trackers
Star trackers are essential tools for astrophotography enthusiasts, offering the ability to capture stunning long-exposure shots of celestial objects while compensating for Earth's rotation. These ingenious devices play a crucial role in overcoming the challenges posed by the movement of the stars, allowing photographers to capture crisp and detailed images of the night sky. In this section, we will explore the basic principles, features, and benefits of star trackers, emphasizing the importance of accurate alignment for achieving exceptional results, particularly when working with longer focal distances.
At its core, a star tracker is a precision mount that counteracts the Earth's rotation by rotating the camera or telescope at the same rate but in the opposite direction. By doing so, the tracker ensures that the stars appear as pinpoints of light in long-exposure photographs, rather than streaks resulting from the Earth's movement. This fundamental capability opens up a world of possibilities for astrophotographers, allowing them to capture stunning images of deep-sky objects, such as nebulae, galaxies, and star clusters, with remarkable clarity and detail.
One of the key factors that significantly impacts the performance of a star tracker is its alignment. Achieving accurate alignment is essential for two main reasons. Firstly, it ensures that the tracker accurately tracks the motion of the stars, minimizing any trailing or blurring effects in the final images. Secondly, precise alignment becomes even more critical when using longer focal distances, such as telephoto lenses or telescopes. With longer focal lengths, any misalignment can be magnified, potentially resulting in distorted or less sharp images. Therefore, taking the time to align the star tracker correctly is an investment that pays off in the form of stunning, high-quality astrophotographs.
The process of aligning a star tracker involves various techniques and considerations. These include using polar alignment methods, such as the polar scope or drift alignment technique, to align the tracker's rotational axis with the celestial pole. Additionally, star tracker mounts often offer additional alignment aids, such as polar alignment apps, electronic polar finders, or compasses, which help photographers accurately position the tracker and ensure precise alignment. Exploring and understanding these alignment techniques will empower astrophotographers to achieve optimal results with their star trackers.
By harnessing the capabilities of star trackers and mastering the art of alignment, astrophotographers gain the ability to capture breathtaking images of the night sky with unprecedented detail and clarity. Whether you aspire to photograph distant galaxies, intricate nebulae, or the mesmerizing beauty of the Milky Way, a well-aligned star tracker becomes an indispensable companion on your journey to unlock the wonders of the universe. In the following sections, we will delve deeper into the techniques, tips, and tricks for aligning and optimizing the performance of star trackers, equipping you with the knowledge and skills to take your astrophotography to new heights.
![]()
Techniques to Align a Tracker Mount
Polar Alignment
Achieving accurate polar alignment is crucial for effective star tracking during astrophotography. Follow these step-by-step instructions, incorporating the valuable insights you provided, to align your star tracker properly:
Prepare Your Equipment
- Securely mount your star tracker on a stable tripod.
- Set up your camera and lens on the star tracker according to the manufacturer's instructions.
Utilize a Polar Alignment App
- If available for your tracker brand, download and use a polar alignment app, such as Polar Scope by iOptron or the equivalent for your specific tracker.
- Familiarize yourself with the app's features and interface.
Calibrate the Polar Scope Diagram
- Look through the polar scope of your star tracker.
- Ensure the diagram within the polar scope is calibrated correctly for your specific star tracker model.
- Adjust the calibration, if necessary, to align the diagram accurately.
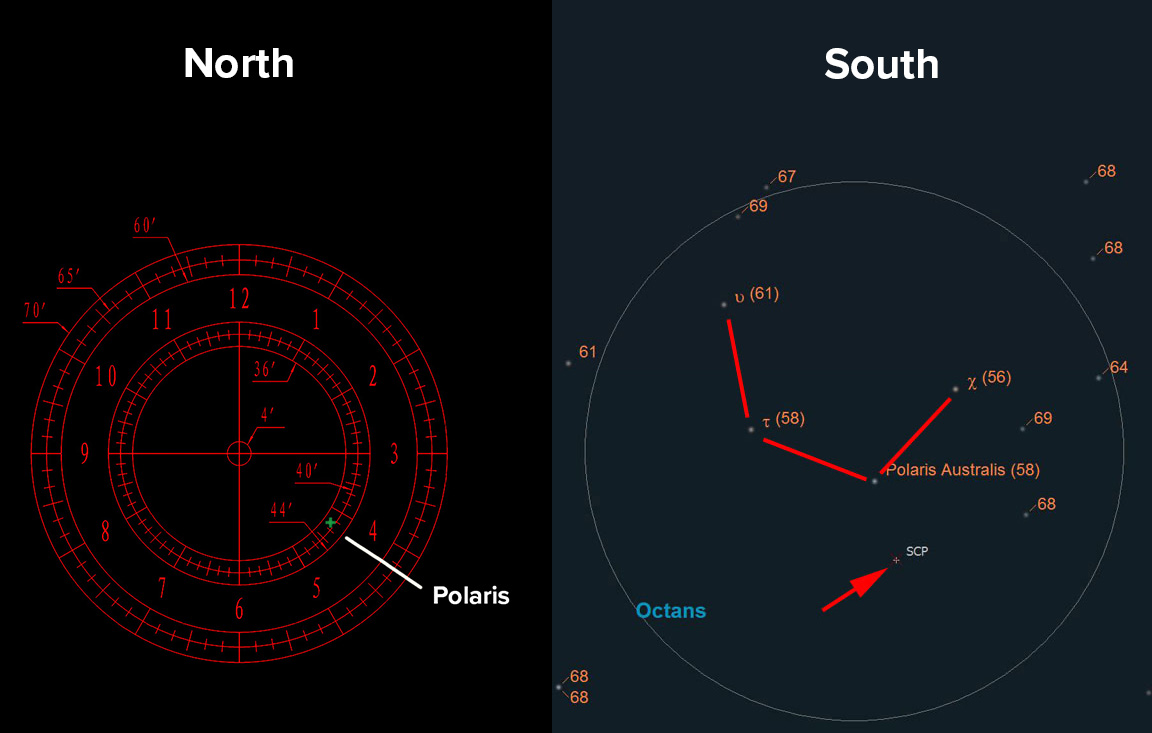
Locate Polaris (Northern Hemisphere) or a Suitable Star (Southern Hemisphere)
- In the Northern Hemisphere, Polaris serves as the primary reference star for polar alignment. In the Southern Hemisphere, identify a bright star suitable for alignment.
- Familiarize yourself with the chosen star's position in relation to the celestial pole before proceeding.
Position Polaris or the Chosen Star
- Using the calibrated polar scope diagram, align Polaris (Northern Hemisphere) or the chosen star (Southern Hemisphere) within the designated area indicated by the diagram.
- Make precise adjustments to the altitude and azimuth controls of the tracker to position the star accurately.
Enhance Visibility with a Red Headlamp
- To improve visibility of the polar scope diagram under low-light conditions, indirect illumination can be helpful.
- Use a red headlamp to point light toward the opposite end of the polar scope, allowing you to see the diagram and the position of Polaris or the chosen star more clearly.
Rough Alignment Using a Phone's Compass App
- Set the azimuth base to the degrees shown in the polar alignment app.
- Roughly align the tracker by utilizing your phone's compass app to point it north.
Note that this technique have only worked for me on iOptron star trackers and has not worked on the SkyWatcher Star Adventurer, and most importantly, I’d recommend using this one only for wider focal lengths.
Consider Focal Length
- Keep in mind that the necessary level of alignment precision varies with the focal length of your lens.
- For wider focal lengths, such as a 14mm lens, a rough alignment may suffice. However, longer focal lengths, like a 400mm lens, require more precise alignment.
- Take into account the specific focal length you intend to use and aim for the appropriate level of alignment accuracy.
Practice and Patience
- Polar alignment can be challenging, particularly for beginners, but it becomes easier with practice.
Be patient and persistent in mastering the alignment process. With experience, you will become more proficient and achieve alignment more quickly.
By following these step-by-step instructions, you will be able to align your star tracker accurately, ensuring precise tracking and enabling you to capture stunning images of the night sky.
Accurate Polar Alignment Using the Drift Method
The drift method, also known as the "declination drift method," is a highly accurate technique for accomplishing polar alignment. While it requires time and patience, it provides precise alignment results. Follow these step-by-step instructions to perform polar alignment using the drift method:
- Roughly Point the Polar Axis
- Begin by aiming the mount's polar axis roughly toward Polaris (in the Northern Hemisphere).
- Adjust the mount's altitude and azimuth controls to position the polar axis as close to Polaris as possible.
- Choose a Star
- Select a star that is slightly above the celestial equator and as close to the south as you can estimate by looking opposite Polaris.
- Use a high-power eyepiece for better accuracy. If the eyepiece has crosshairs, center the star on them. Otherwise, place the star on the north or south edge of the field and slightly defocus it.
- Observe the Drift
- Turn on the mount's clock drive and observe any east-west drift of the star in the eyepiece.
- If the star drifts south, it indicates that the polar axis is pointing too far east.
- If the star drifts north, it indicates that the polar axis is pointing too far west.
- Adjust the Polar Axis
- Shift the polar axis slightly left or right to compensate for the observed drift.
- Continue adjusting until there is no noticeable drift of the star in the eyepiece.
- Choose a Star near the Celestial Equator
- Now, select a star that is near the celestial equator, low in the eastern sky.
- Observe any drift of the star in the eyepiece.
- Fine-tune the Polar Axis
- If the star drifts south, it suggests that the polar axis is pointing too low.
- If the star drifts north, it suggests that the polar axis is pointing too high.
- Adjust the polar axis accordingly to eliminate the drift.
- Repeat the Process
- Go back to the beginning and repeat the process, as each adjustment may slightly affect the previous alignment.
- Continuously refine the polar alignment until all visible drift is eliminated.
- Consider Adjustments for Specific Situations
- If your view of the eastern sky is obstructed, you can use a star low in the west and reverse the instructions for "too high" and "too low."
- For observers in the Earth's Southern Hemisphere, reverse the directions for "north" and "south."
By following these steps, you can achieve highly accurate polar alignment using the drift method. This alignment technique ensures your telescope is precisely aligned for capturing long-exposure images of deep-sky objects. Remember to be patient and persistent, as each adjustment brings you closer to an optimal alignment for stunning astrophotography results.
Tracker Methods: Stars, Half-Speed, Moon, and Sun
Star Tracking: The primary purpose of star trackers is to accurately track the motion of stars during long exposures. By aligning the tracker with the celestial pole, you can capture pinpoint stars with minimal trailing, revealing their intricate details and colors.
Half-Speed Tracking: Some star trackers offer a half-speed tracking mode, which reduces the tracking speed by half. This allows for longer exposure times, especially when using wider focal lengths. It can be advantageous for capturing extended star trails or increasing the exposure time for landscape astrophotography.
Moon and Sun Tracking: Star trackers can also be utilized for tracking the Moon and the Sun. By aligning the tracker with the celestial pole during the day, you can accurately track the apparent movement of these celestial bodies. This opens up opportunities for capturing detailed lunar landscapes or unique solar phenomena.
It's worth noting that there are various star tracker models available on the market, including the iOptron SkyTracker Pro, SkyWatcher Star Adventurer, and others. Each tracker has its own specific features and methods of alignment. Explore the user manuals and online resources provided by the manufacturers to learn the alignment techniques specific to your tracker. Mastering the art of aligning a star tracker empowers astrophotographers to capture stunning images of the night sky with pinpoint accuracy. Experiment with different alignment techniques, understand the capabilities of your specific tracker, and let your creativity soar as you unlock the full potential of long-exposure astrophotography.
Did you enjoy this post?
Share it with your friends and family